Tabela scroll com HTML e CSS
tenho uma tabela como a que encho com dados
<table id="products-table"  style="overflow-y:scroll" >
    <thead>
        <tr>
            <th>Product (Parent Product)</th>
            <th>Associated Sites</th>
            <th>Actions</th>
        </tr>
    </thead>
    <tbody>
        @for (int i = 0; i < Model.Count(); i++)
        {
        <tr>
            <td>
                <a href="Edit"><strong>@Model.ElementAt(i).Name</strong></a><br />
            </td>
            <td>
                <span class="lesser"></span>
            </td>
            <td>@Html.ActionLink("Edit Product", "Edit", "Products")<br />
                @Html.ActionLink("Associate Site", "Associate", "Products")
            </td>
         </tr>
        }
        <tr>
</tbody>
</table>
e CSS assim
    #products-table
{
     width: 200px;
    height: 400px;
    overflow:scroll;
}
mas o scroll não funciona, eu quero corrigir a altura da mesa e se ela exceder, então trabalhar com scrollbar {[[4]}
8 answers
Primeira Solução
<table cellspacing="0" cellpadding="0" border="0" width="325">
 <tr>
  <td>
   <table cellspacing="0" cellpadding="1" border="1" width="300" >
     <tr style="color:white;background-color:grey">
        <th>Header 1</th>
        <th>Header 2</th>
     </tr>
   </table>
  </td>
 </tr>
<tr>
<td>
   <div style="width:320px; height:60px; overflow:auto;">
     <table cellspacing="0" cellpadding="1" border="1" width="300" >
       <tr>
         <td>new item</td>
         <td>new item</td>
       </tr>
       <tr>
         <td>new item</td>
         <td>new item</td>
       </tr>
          <tr>
         <td>new item</td>
         <td>new item</td>
       </tr>
          <tr>
         <td>new item</td>
         <td>new item</td>
       </tr>
     </table>
   </div>
  </td>
 </tr>
</table>
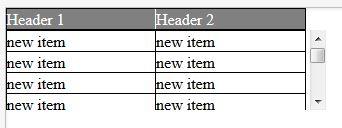
Isto está a funcionar em todo o navegador
Demo jsfiddle http://jsfiddle.net/nyCKE/6302/
Segunda Solução
Isto é específico apenas para o seu código, mas pode ter problemas com IE9 por isso eu sugeriria a primeira solução
#products-table
{
 width: 200px;
 height: 400px;
 overflow: auto;
}
Ou Tabela com cabeçalho fixo
tbody {
 width: 200px;
 height: 400px;
 overflow: auto;
}
Demo jsfidle http://jsfiddle.net/nyCKE/7588/
- Põe a mesa em divã embalada
- Coloque o conteúdo das células de cabeçalho no div
- fixar o cabeçalho conteúdo , ver CSS
HTML
<div id="scrolltable">
    <table>
        <tr><th><div>first col</div></th><th><div>second</div></th></tr>
        <tr><td>foo</td><td>bar</td></tr>
        ... many rows ...
    </table>
</div>
CSS
#scrolltable { margin-top: 20px; height: 200px; overflow: auto; }
#scrolltable th div { position: absolute; margin-top: -20px; }
Funciona apenas no Chrome, mas pode ser adaptado a outros navegadores modernos. Table falls back to common table with scroll bar in other brws. Usa a propriedade FLEX CSS3.
<table border="1px" class="flexy">
    <caption>Lista Sumnjivih vozila:</caption>
    <thead>
        <tr>
            <td>Opis Sumnje</td>
        <td>Registarski<br>broj vozila</td>
        <td>Datum<br>Vreme</td>
        <td>Brzina<br>(km/h)</td>
        <td>Lokacija</td>
        <td>Status</td>
        <td>Akcija</td>
        </tr>
    </thead>
    <tbody>

        <tr>
        <td>Osumnjičen tranzit</td>
        <td>NS182TP</td>
        <td>23-03-2014 20:48:08</td>
        <td>11.3</td>
        <td>Raskrsnica kod pumpe<br></td>
        <td></td>
        <td>Prikaz</td>
        </tr>
        <tr>

        <tr>
        <td>Osumnjičen tranzit</td>
        <td>NS182TP</td>
        <td>23-03-2014 20:48:08</td>
        <td>11.3</td>
        <td>Raskrsnica kod pumpe<br></td>
        <td></td>
        <td>Prikaz</td>
        </tr>
        <tr>

        <tr>
        <td>Osumnjičen tranzit</td>
        <td>NS182TP</td>
        <td>23-03-2014 20:48:08</td>
        <td>11.3</td>
        <td>Raskrsnica kod pumpe<br></td>
        <td></td>
        <td>Prikaz</td>
        </tr>
        <tr>


        <tr>
        <td>Osumnjičen tranzit</td>
        <td>NS182TP</td>
        <td>23-03-2014 20:48:08</td>
        <td>11.3</td>
        <td>Raskrsnica kod pumpe<br></td>
        <td></td>
        <td>Prikaz</td>
        </tr>

    </tbody>
</table>
Estilo (CSS 3):
caption {
    display: block;
    line-height: 3em;
    width: 100%;
    -webkit-align-items: stretch;
    border: 1px solid #eee;
}

       .flexy {
            display: block;
            width: 90%;
            border: 1px solid #eee;
            max-height: 320px;
            overflow: auto;
        }

        .flexy thead {
            display: -webkit-flex;
            -webkit-flex-flow: row;
        }

        .flexy thead tr {
            padding-right: 15px;
            display: -webkit-flex;
            width: 100%;
            -webkit-align-items: stretch;
        }

        .flexy tbody {
            display: -webkit-flex;
            height: 100px;
            overflow: auto;
            -webkit-flex-flow: row wrap;
        }
        .flexy tbody tr{
            display: -webkit-flex;
            width: 100%;
        }

        .flexy tr td {
            width: 15%;
        }
Para aqueles que se perguntam como implementar a solução do Garry com mais de um cabeçalho, é isto:
#wrapper {
  width: 235px;
}

table {
  border: 1px solid black;
  width: 100%;
}

th,
td {
  width: 100px;
  border: 1px solid black;
}

thead>tr {
  position: relative;
  display: block;
}

tbody {
  display: block;
  height: 80px;
  overflow: auto;
}
<div id="wrapper">
<table>
<thead>
<tr>
<th>column1</th>
<th>column2</th>
</tr>
</thead>
<tbody>
<tr>
<td>row1</td>
<td>row1</td>
</tr>
<tr>
<td>row2</td>
<td>row2</td>
</tr>
<tr>
<td>row3</td>
<td>row3</td>
</tr>
<tr>
<td>row4</td>
<td>row4</td>
</tr>
</tbody>
</table>
</div>- criar dois divs dentro de um
display: inline-block - no primeiro div, coloque uma tabela com apenas o cabeçalho (tabela de cabeçalho
tabhead) - no segundo div, coloque uma tabela com cabeçalho e dados (tabela de Dados / Tabela completa
tabfull) - use JavaScript, use
setTimeout(() => {/*...*/})para executar o código após a renderização / depois de preencher a tabela com os resultados defetch - medir a largura de cada th na tabela de dados (utilizando
clientWidth) - aplicar a mesma largura à contraparte no cabeçalho
- define a visibilidade do cabeçalho da tabela de dados como escondida e coloca a margem em -1 * altura da tabela de dados thead pixels
Com alguns ajustes, este é o método a usar (para brevidade / simplicidade, eu usei d3js, as mesmas operações podem ser feitas usando DOM simples):
setTimeout(() => { // pass one cycle
  d3.select('#tabfull')
    .style('margin-top', (-1 * d3.select('#tabscroll').select('thead').node().getBoundingClientRect().height) + 'px')
    .select('thead')
      .style('visibility', 'hidden');
  let widths=[]; // really rely on COMPUTED values
  d3.select('#tabfull').select('thead').selectAll('th')
    .each((n, i, nd) => widths.push(nd[i].clientWidth));
  d3.select('#tabhead').select('thead').selectAll('th')
    .each((n, i, nd) => d3.select(nd[i])
          .style('padding-right', 0)
          .style('padding-left', 0)
          .style('width', widths[i]+'px'));
})
Esperar pelo ciclo de renderização tem a vantagem de usar o motor de disposição do navegador thoughout o processo-para qualquer tipo de header; não é obrigado a condições especiais ou comprimentos de conteúdo de células sendo de alguma forma semelhante. Ele também ajusta corretamente para barras de posicionamento visíveis (como nas janelas)
Eu coloquei um codepen com um exemplo completo aqui: https://codepen.io/sebredhh/pen/QmJvKyAdiciona um gradiente de desbotamento a um elemento de tabela HTML transbordante para indicar melhor que há mais conteúdo a ser patrulhado.
- tabela com cabeçalho fixo
- gradiente de deslocamento de fluxo excessivo
- barra de posicionamento personalizada
Ver o exemplo vivo Abaixo:
$("#scrolltable").html("<table id='cell'><tbody></tbody></table>");
$("#cell").append("<thead><tr><th><div>First col</div></th><th><div>Second col</div></th></tr></thead>");

for (var i = 0; i < 40; i++) {
  $("#scrolltable > table > tbody").append("<tr><td>" + "foo" + "</td><td>" + "bar" + "</td></tr>");
}
/* Table with fixed header */
table,
thead {
width: 100%;
text-align: left;
}
#scrolltable {
margin-top: 50px;
height: 120px;
overflow: auto;
width: 200px;
}
#scrolltable table {
border-collapse: collapse;
}
#scrolltable tr:nth-child(even) {
background: #EEE;
}
#scrolltable th div {
position: absolute;
margin-top: -30px;
}
/* Custom scrollbar */
::-webkit-scrollbar {
width: 8px;
}
::-webkit-scrollbar-track {
box-shadow: inset 0 0 6px rgba(0, 0, 0, 0.3);
border-radius: 10px;
}
::-webkit-scrollbar-thumb {
border-radius: 10px;
box-shadow: inset 0 0 6px rgba(0, 0, 0, 0.5);
}
/* Overflow scroll gradient */
.overflow-scroll-gradient {
position: relative;
}
.overflow-scroll-gradient::after {
content: '';
position: absolute;
bottom: 0;
width: 240px;
height: 25px;
background: linear-gradient( rgba(255, 255, 255, 0.001), white);
pointer-events: none;
}<script src="https://ajax.googleapis.com/ajax/libs/jquery/2.1.1/jquery.min.js"></script>
<div class="overflow-scroll-gradient">
<div id="scrolltable">
</div>
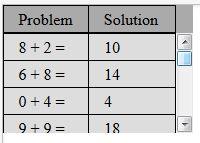
</div>Este trabalho para mim
Demo: jsfiddle
$(function()
{
    Fixed_Header();
});
function Fixed_Header()
{
    $('.User_Table thead').css({'position': 'absolute'});
    $('.User_Table tbody tr:eq("2") td').each(function(index,e){
        $('.User_Table thead tr th:eq("'+index+'")').css({'width' : $(this).outerWidth() +"px" });
    });
    var Header_Height = $('.User_Table thead').outerHeight();
    $('.User_Table thead').css({'margin-top' : "-"+Header_Height+"px"});
    $('.User_Table').css({'margin-top' : Header_Height+"px"});
}
<div style="overflow:auto">
    <table id="table2"></table>
</div>
Tente este código para a tabela de transbordamento só funcionará na div tag