Como faço para criar uma lágrima em HTML?
Eu não quero usarimagens uma vez que elas ficariam desfocadas ao escalar
tentei com CSS:
.tear {
  display: inline-block;
  transform: rotate(-30deg);
  border: 5px solid green;
  width: 50px;
  height: 100px;
  border-top-left-radius: 50%;
  border-bottom-left-radius: 50%;
  border-bottom-right-radius: 50%;
}
<div class="tear">
</div>e depois tentei com SVG:
<svg viewBox="0 100 100">
  <polygon points="50,0 100,70 50,100 0,70"/>
</svg>Existe uma forma de criar esta forma para que possa ser usada numa página HTML?
12 answers
Abordagem SVG:
Você pode alcançar a curva dupla facilmente com um em linha SVG e o elemento <path/> em vez do elemento <polygon/> que não permite formas curvas.
O seguinte exemplo usa o elemento <path/> com:
- 2 comandos da curva de bezier quadrática para as 2 curvas de topo (linhas que começam com
Q) - 1 comando arc para o fundo grande (linha que começa com
A)
<svg width="30%" viewbox="0 0 30 42">
  <path fill="transparent" stroke="#000" stroke-width="1.5"
        d="M15 3
           Q16.5 6.8 25 18
           A12.8 12.8 0 1 1 5 18
           Q13.5 6.8 15 3z" />
</svg>
SVG é uma grande ferramenta para fazer este tipo de formas com curvas duplas. Você pode verificar este postar sobre curvas duplas com uma comparação SVG / CSS. Algumas das vantagens de usar SVG neste caso são:
- Controlo da curva
- controlo de enchimento (opacidade, cor)
- controlo do traço (largura, opacidade, cor)
- quantidade de código Tempo para construir e manter o forma
- escalável
- nenhum pedido HTTP (se usado em linha como no exemplo)
O Suporte do navegador para o SVG incorporado volta ao Internet Explorer 9. Ver canIuse para mais informações.
Raio De Fronteira Básico
Você pode fazer isso dentro do CSS relativamente facilmente usando raio de fronteira' e se transforma. A tua CSS estava um pouco fora.
.tear {
  width: 50px;
  height: 50px;
  border-radius: 0 50% 50% 50%;
  border: 3px solid black;
  transform: rotate(45deg);
  margin-top: 20px;
}
<div class="tear"></div>Raio Avançado De Fronteira
Isto será muito semelhante ao acima, mas dá-lhe um pouco mais de forma.
.tear {
  width: 50px;
  height: 50px;
  border-radius: 80% 0 55% 50% / 55% 0 80% 50%;
  border: 3px solid black;
  transform: rotate(-45deg);
  margin-top: 20px;
}
<div class="tear"></div>- usou uma altura diferente da largura
- Ainda não rodaste o tamanho do ângulo correcto
.tear {
  display: inline-block;
  transform: rotate(-45deg);
  border: 5px solid green;
  width: 100px;
  height: 100px;
  border-top-left-radius: 50%;
  border-bottom-left-radius: 50%;
  border-bottom-right-radius: 50%;
}
/***for demo only***/

.tear {
  margin: 50px;
}
<div class="tear">
</div>por favor, note também que para gravar no tamanho do CSS, você poderá reescrever as suas propriedades do raio de contorno para:
border-radius: 50% 0 50% 50%;
Isto pode ser melhorado com pseudo-elementos. como mostrado neste violino
Alternativas
Encontrei isto por Vinay Challuru no codepen.
Por favor, note que com a lógica aqui, eu fui capaz de criar o SVG para quase qualquer forma de construção possível/etc. Por exemplo, uma saída rápida foi:
<svg viewBox='0 0 400 400'>
  <path fill="none" stroke="#333" stroke-width="5" d="M200,40 C200,115 280,180 280,240 A80,80,0 0,1,120,240 C120,180 200,115 200,40" stroke-linejoin='miter'></path>
</svg>var SVG = function() {
this.element = document.getElementsByTagName("svg")[0];
this.namespace = "http://www.w3.org/2000/svg";
this.width = 400;
this.height = 400;
}
/****Let's initialise our SVG ready to draw our shape****/
var svg = new SVG();
/****This sets up the user interface - we've included the script for this as an external library for the codepen****/
var gui = new dat.GUI();
/****Here's where the code to create the shape begins!****/
var Teardrop = function() {
this.x = svg.width * 0.5;
this.y = svg.height * 0.1;
this.width = svg.width * 0.4;
this.triangleHeight = svg.height * 0.5;
this.yCP1 = svg.height * 0.2;
this.yCP2 = svg.height * 0.45;
this.element = null;
this.ctrlPoints = [];
this.anchors = [];
this.fill = "none";
this.stroke = "#333";
this.strokeWidth = 2;
this.showCtrlPoints = true;
this.init();
}
Teardrop.prototype.init = function() {
this.element = document.createElementNS(svg.namespace, "path");
svg.element.appendChild(this.element);
this.element.setAttribute("fill", this.fill);
this.element.setAttribute("stroke", this.stroke);
this.element.setAttribute("stroke-width", this.strokeWidth);
for (var i = 0; i < 3; i++) {
this.ctrlPoints.push(document.createElementNS(svg.namespace, "circle"));
svg.element.appendChild(this.ctrlPoints[i]);
this.ctrlPoints[i].setAttribute("fill", this.fill);
this.ctrlPoints[i].setAttribute("stroke", 'red');
this.ctrlPoints[i].setAttribute("stroke-width", 1);
this.anchors.push(document.createElementNS(svg.namespace, "line"));
svg.element.appendChild(this.anchors[i]);
this.anchors[i].setAttribute("stroke-width", 1);
this.anchors[i].setAttribute("stroke", this.stroke);
this.anchors[i].setAttribute("stroke-dasharray", "3,2");
}
this.draw();
}
Teardrop.prototype.draw = function() {
this.radius = this.width / 2;
path = [
"M", this.x, ",", this.y,
"C", this.x, ",", this.yCP1, " ", this.x + this.width / 2, ",", this.yCP2, " ", this.x + this.width / 2, ",", this.y + this.triangleHeight,
"A", this.radius, ",", this.radius, ",", "0 0,1,", this.x - this.width / 2, ",", this.y + this.triangleHeight,
"C", this.x - this.width / 2, ",", this.yCP2, " ", this.x, ",", this.yCP1, " ", this.x, ",", this.y
];
this.element.setAttribute("d", path.join(""));
cpCoords = [];
cpCoords[0] = [this.x, this.yCP1];
cpCoords[1] = [this.x - this.width / 2, this.yCP2];
cpCoords[2] = [this.x + this.width / 2, this.yCP2];
anchorCoords = [];
anchorCoords[0] = [this.x, this.y];
anchorCoords[1] = [this.x - this.width / 2, this.y + this.triangleHeight];
anchorCoords[2] = [this.x + this.width / 2, this.y + this.triangleHeight];
for (var i = 0; i < 3; i++) {
this.ctrlPoints[i].setAttribute("cx", cpCoords[i][0]);
this.ctrlPoints[i].setAttribute("cy", cpCoords[i][1]);
this.anchors[i].setAttribute("x1", cpCoords[i][0]);
this.anchors[i].setAttribute("x2", anchorCoords[i][0]);
this.anchors[i].setAttribute("y1", cpCoords[i][1]);
this.anchors[i].setAttribute("y2", anchorCoords[i][1]);
if (this.showCtrlPoints) {
this.ctrlPoints[i].setAttribute("r", 2);
this.anchors[i].setAttribute("stroke-width", 1);
} else {
this.ctrlPoints[i].setAttribute("r", 0);
this.anchors[i].setAttribute("stroke-width", 0);
}
}
}
var teardrop = new Teardrop();
gui.add(teardrop, 'triangleHeight', 0, svg.height * 0.75);
gui.add(teardrop, 'width', 0, 200);
gui.add(teardrop, 'yCP1', 0, svg.height);
gui.add(teardrop, 'yCP2', 0, svg.height);
gui.add(teardrop, 'showCtrlPoints', 0, svg.height);
for (var i in gui.__controllers) {
gui.__controllers[i].onChange(function() {
teardrop.draw();
});
}html,
body {
height: 100%;
}
svg {
display: block;
margin: 0 auto;
background: url('http://unitedshapes.com/images/graph-paper/graph-paper.png');
}<script src="//cdnjs.cloudflare.com/ajax/libs/dat-gui/0.5/dat.gui.min.js"></script>
<svg width='400px' height='400px'></svg>Disclaimer I did not write the above pen, only sourced it.
Versão CSS
Embora isto esteja longe de estar completo, você também pode ser capaz de gerar esta forma usando CSS.
.tear{
    height:200px;
    width:200px;
    background: linear-gradient(to bottom, rgba(0,0,0,0) 0%,rgba(0,0,0,0) 29%,rgba(0,0,0,1) 30%,rgba(0,0,0,1) 100%);
    border-radius:50%;
    margin:120px;
    position:relative;
}
.tear:before{
    content:"";
    position:absolute;
    top:-70%;left:0%;
    height:100%;width:50%;
    background: radial-gradient(ellipse at -50% -50%, rgba(0,0,0,0) 0%,rgba(0,0,0,0) 75%,rgba(0,0,0,1) 76%,rgba(0,0,0,1) 100%);
}
.tear:after{
    content:"";
    position:absolute;
    top:-70%;left:50%;
    height:100%;width:50%;
    background: radial-gradient(ellipse at 150% -50%, rgba(0,0,0,0) 0%,rgba(0,0,0,0) 75%,rgba(0,0,0,1) 76%,rgba(0,0,0,1) 100%);
}
<div class="tear"></div>Versão SVG
Eu deveria saber que SVG deve estar no topo desta resposta, no entanto, eu gosto um desafio e, portanto, aqui está uma tentativa com SVG.
svg {
  height: 300px;
}
svg path {
  fill: tomato;
}
<svg xmlns="http://www.w3.org/2000/svg" xmlns:xlink="http://www.w3.org/1999/xlink" version="1.1" viewBox="0 0 100 100">
<path d="M49.015,0.803
c-0.133-1.071-1.896-1.071-2.029,0
C42.57,36.344,20,43.666,20,68.367
C20,83.627,32.816,96,48,96
s28-12.373,28-27.633
C76,43.666,53.43,36.344,49.015,0.803z
M44.751,40.09
c-0.297,1.095-0.615,2.223-0.942,3.386
c-2.007,7.123-4.281,15.195-4.281,24.537
c0,5.055-2.988,6.854-5.784,6.854
c-3.189,0-5.782-2.616-5.782-5.831
c0-11.034,5.315-18.243,10.005-24.604
c1.469-1.991,2.855-3.873,3.983-5.749
c0.516-0.856,1.903-0.82,2.533,0.029
C44.781,39.116,44.879,39.619,44.751,40.09z"/>
</svg>path, Você seria capaz de alterar a forma do seu design de lágrima.
IMO esta forma requer curvas suaves a beziers para assegurar a continuidade da curva.
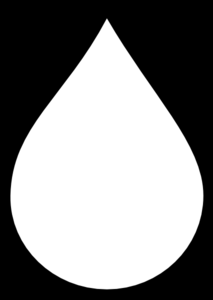
A gota em questão:
Para a gota em questão,
- as curvas suaves não podem ser usadas, pois os pontos de controlo não terão o mesmo comprimento. Mas ainda precisamos fazer com que os pontos de controle fiquem exatamente opostos (180 graus) aos pontos de controle anteriores, para garantir a continuidade completa da curva A imagem abaixo ilustra este ponto :
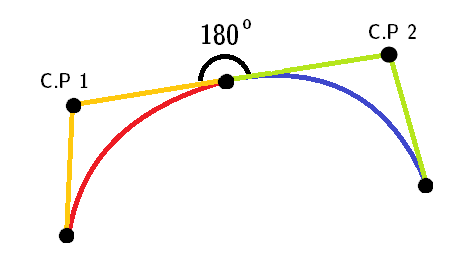
Nota : as curvas vermelho e azul são duas curvas quadráticas diferentes.
stroke-linejoin="miter", para a parte superior pontiaguda.Como esta forma só usa sucessivos
ccomandos, podemos omiti-lo.
Aqui está o último trecho:
<svg height="300px" width="300px" viewBox="0 0 12 16">
  <path fill="#FFF" stroke="black" stroke-width="0.5" stroke-linejoin="miter"
        d="M 6 1 c -2 3 -5 5 -5 9
           0 7 10 7 10 0
           0 -4 -3 -6 -5 -9z" />
</svg>
TBH though , accepted answer's curves are not quite continuous.
Para IE 5-8 (VML)
Só funciona no IE 5-8. O VML usa comandos diferentes de O SVG . Exemplo. ele usa v para beziers cúbicas relativas .
Nota: este trecho não vai correr no IE 5-8 também. Você precisa criar um arquivo html e executá-lo diretamente no navegador.
<!DOCTYPE HTML PUBLIC "-//W3C//DTD HTML 4.01 Transitional//EN">
<html xmlns:v="urn:schemas-microsoft-com:vml">
<head>
    <style> v\:* { behavior: url(#default#VML); }

    </style >
</head>
<body>
    <div style="width:240; height:320;">
        <v:shape coordorigin="0 0" coordsize="12 16" fillcolor="white" strokecolor="black" strokewidth="1"
            strokeweight="5" style="width:240; height:320"
            path="M 6 1 v -2 3 -5 5 -5 9
           0 7 10 7 10 0
           0 -4 -3 -6 -5 -9 x e">
        </v:shape>
    </div>
</body>
</html>
Gota: (💧)
Ou
GOTÍCULA PRETA: (🌢)
Escala em conformidade!
<svg version="1.1" id="Layer_1" xmlns="http://www.w3.org/2000/svg" xmlns:xlink="http://www.w3.org/1999/xlink" x="0px" y="0px" width="223.14px" height="319.008px" viewBox="0 0 223.14 319.008" enable-background="new 0 0 223.14 319.008" xml:space="preserve">
  <path fill="none" stroke="#000000" stroke-width="12" stroke-miterlimit="10" d="M111.57,13.291c0,0,57.179,86.984,72.719,108.819
    	c30.359,42.66,41.005,114.694,1.626,154.074c-20.464,20.463-47.533,30.293-74.344,29.488h-0.002
    	c-26.811,0.805-53.88-9.025-74.344-29.488C-2.154,236.804,8.492,164.77,38.851,122.11C54.391,100.275,111.57,13.291,111.57,13.291z" />
</svg>Área de desenho HTML
Esta é uma opção descoberta neste tópico até agora. Os comandos usados para desenhos de tela são muito semelhantes ao SVG (e web-tiki merece os créditos para a ideia base usada nesta resposta).A forma em questão pode ser criada usando os próprios comandos da curva da tela (quadrática ou Bezier) ou a API do caminho. A resposta contém exemplos para os três métodos.
O suporte do navegador para o Canvas é bastante bom.
Usando Curvas Quadráticas
window.onload = function() {
  var canvas = document.getElementById('canvas');
  if (canvas.getContext) {
    var ctx = canvas.getContext('2d');

    ctx.beginPath();
    ctx.lineJoin = 'miter';
    ctx.moveTo(120, 20);
    ctx.quadraticCurveTo(117.5, 30, 148, 68);
    ctx.arc(120, 88, 34.5, 5.75, 3.66, false);
    ctx.quadraticCurveTo(117.5, 35, 120, 20);
    ctx.closePath();
    ctx.strokeStyle = '#000';
    ctx.lineWidth = 2;
    ctx.fillStyle = '#77CCEE'
    ctx.stroke();
    ctx.fill();
  }
}
canvas {
margin: 50px;
height: 100px;
width: 200px;
transform: scale(1.5);
}
body{
background-image: radial-gradient(circle, #3F9CBA 0%, #153346 100%);
}<canvas id='canvas'></canvas>Abaixo está uma versão avançadacom gradiente de enchimento e sombras. Eu também incluí um efeito hover na forma para ilustrar uma desvantagem da tela quando comparado com SVG. O desenho é baseado em pixels e, portanto, pareceria borrado / pixelizado quando escalado para além de um determinado ponto. A única solução para isso seria repintar a forma em cada navegador redimensionar o que é uma sobrecarga.
window.onload = function() {
  var canvas = document.getElementById('canvas');
  if (canvas.getContext) {
    var ctx = canvas.getContext('2d');
    var lineargradient = ctx.createRadialGradient(135, 95, 1, 135, 95, 10);
    lineargradient.addColorStop(0, 'white');
    lineargradient.addColorStop(1, '#77CCEE');
    ctx.beginPath();
    ctx.lineJoin = 'miter';
    ctx.moveTo(120, 20);
    ctx.quadraticCurveTo(117.5, 30, 148, 68);
    ctx.arc(120, 88, 34.5, 5.75, 3.66, false);
    ctx.quadraticCurveTo(117.5, 35, 120, 20);
    ctx.closePath();
    ctx.strokeStyle = '#333';
    ctx.lineWidth = 3;
    ctx.fillStyle = lineargradient;
    ctx.shadowOffsetX = 2;
    ctx.shadowOffsetY = 2;
    ctx.shadowBlur = 2;
    ctx.shadowColor = "rgba(50, 50, 50, 0.5)";
    ctx.stroke();
    ctx.fill();
  }
}
canvas {
margin: 50px;
height: 100px;
width: 200px;
transform: scale(1.5);
}
/* Just for demo */
body{
background-image: radial-gradient(circle, #3F9CBA 0%, #153346 100%);
}
canvas{
transition: all 1s;
}
canvas:hover{
transform: scale(2);
}<canvas id='canvas'></canvas>Usando Curvas Bezier
window.onload = function() {
  var canvas = document.getElementById('canvas');
  if (canvas.getContext) {
    var ctx = canvas.getContext('2d');
    var lineargradient = ctx.createRadialGradient(135, 95, 1, 135, 95, 10);
    lineargradient.addColorStop(0, 'white');
    lineargradient.addColorStop(1, '#77CCEE');
    ctx.beginPath();
    ctx.lineJoin = 'miter';
    ctx.arc(120, 88, 35, 5.74, 3.66, false);
    ctx.bezierCurveTo(100, 55, 122, 27.5, 120, 20);
    ctx.bezierCurveTo(122, 27.5, 121, 31.5, 150, 70);
    ctx.closePath();
    ctx.strokeStyle = 'rgba(109,195,250,0.2)';
    ctx.lineWidth = 1;
    ctx.fillStyle = lineargradient;
    ctx.shadowOffsetX = 2;
    ctx.shadowOffsetY = 2;
    ctx.shadowBlur = 2;
    ctx.shadowColor = "rgba(50, 50, 50, 0.5)";
    ctx.stroke();
    ctx.fill();
  }
}
canvas {
margin: 75px;
height: 300px;
width: 300px;
transform: scale(1.5);
}
body {
background-image: radial-gradient(circle, #3F9CBA 0%, #153346 100%);
}<canvas id='canvas' height='300' width='300'></canvas>Usando a API Path
window.onload = function() {
  var canvas = document.getElementById('canvas');
  if (canvas.getContext) {
    var ctx = canvas.getContext('2d');

    ctx.lineJoin = 'miter';
    var p = new Path2D("M120 20 Q117.5 30 146 68 A34 34 0 1 1 92 68 Q117.5 35 120 20z");
    ctx.strokeStyle = '#000';
    ctx.lineWidth = 2;
    ctx.fillStyle = '#77CCEE'
    ctx.stroke(p);
    ctx.fill(p);
  }
}
canvas {
margin: 50px;
height: 100px;
width: 200px;
transform: scale(1.5);
}
body {
background-image: radial-gradient(circle, #3F9CBA 0%, #153346 100%);
}<canvas id='canvas'></canvas>Nota: {[35] } Como mencionado na minha resposta aqui, a API do caminho ainda não é suportada por IE e Safari.
Mais leitura:
Também encontrei Este em Codepen feito pelo utilizadorAna Tudor Usando o css e o box-shadow estilo e equações paramétricas. Muito simples, muito pouco código. E muitos navegadores suportam o estilo de Caixa-sombra CSS3:
body {
  background-color: black;
}
.tear {
  position: absolute;
  top: 50%;
  left: 50%;
  margin: -0.125em;
  width: 0.25em;
  height: 0.25em;
  border-radius: 50%;
  box-shadow: 0em -5em red, 0.00118em -4.97592em #ff1800, 0.00937em -4.90393em #ff3000, 0.03125em -4.7847em #ff4800, 0.07283em -4.6194em #ff6000, 0.13915em -4.40961em #ff7800, 0.23408em -4.15735em #ff8f00, 0.36em -3.86505em #ffa700, 0.51777em -3.53553em #ffbf00, 0.70654em -3.17197em gold, 0.92382em -2.77785em #ffef00, 1.16547em -2.35698em #f7ff00, 1.42582em -1.91342em #dfff00, 1.69789em -1.45142em #c7ff00, 1.97361em -0.97545em #afff00, 2.2441em -0.49009em #97ff00, 2.5em 0.0em #80ff00, 2.73182em 0.49009em #68ff00, 2.93032em 0.97545em #50ff00, 3.08681em 1.45142em #38ff00, 3.19358em 1.91342em #20ff00, 3.24414em 2.35698em #08ff00, 3.23352em 2.77785em #00ff10, 3.15851em 3.17197em #00ff28, 3.01777em 3.53553em #00ff40, 2.81196em 3.86505em #00ff58, 2.54377em 4.15735em #00ff70, 2.21783em 4.40961em #00ff87, 1.84059em 4.6194em #00ff9f, 1.42017em 4.7847em #00ffb7, 0.96608em 4.90393em #00ffcf, 0.48891em 4.97592em #00ffe7, 0.0em 5em cyan, -0.48891em 4.97592em #00e7ff, -0.96608em 4.90393em #00cfff, -1.42017em 4.7847em #00b7ff, -1.84059em 4.6194em #009fff, -2.21783em 4.40961em #0087ff, -2.54377em 4.15735em #0070ff, -2.81196em 3.86505em #0058ff, -3.01777em 3.53553em #0040ff, -3.15851em 3.17197em #0028ff, -3.23352em 2.77785em #0010ff, -3.24414em 2.35698em #0800ff, -3.19358em 1.91342em #2000ff, -3.08681em 1.45142em #3800ff, -2.93032em 0.97545em #5000ff, -2.73182em 0.49009em #6800ff, -2.5em 0.0em #7f00ff, -2.2441em -0.49009em #9700ff, -1.97361em -0.97545em #af00ff, -1.69789em -1.45142em #c700ff, -1.42582em -1.91342em #df00ff, -1.16547em -2.35698em #f700ff, -0.92382em -2.77785em #ff00ef, -0.70654em -3.17197em #ff00d7, -0.51777em -3.53553em #ff00bf, -0.36em -3.86505em #ff00a7, -0.23408em -4.15735em #ff008f, -0.13915em -4.40961em #ff0078, -0.07283em -4.6194em #ff0060, -0.03125em -4.7847em #ff0048, -0.00937em -4.90393em #ff0030, -0.00118em -4.97592em #ff0018;
}
<div class="tear"></div>Versão CSS
Como há algumas respostas aqui pensei por que não adicionar a isso com outro método. Isto está usando tanto HTML e CSS para criar a lágrima. Isto permitir-lhe-á alterar a cor da borda e do fundo da lágrima, bem como re-dimensionar a parte superior da lágrima.Usando um único div podemos criar um círculo com border e border-radius. Em seguida, usando pseudo elementos (:before & :after) nós criamos um CSS triângulo mais aqui, isto funcionará como a ponta da lágrima. Usando o :before como fronteira colocamos :after em cima com um tamanho menor e a cor de fundo desejada.
div {
  width: 100px;
  height: 100px;
  border-radius: 50%;
  border: 4px solid;
  margin: 80px auto;
  position: relative;
}
div:before,
div:after {
  content: "";
  display: block;
  position: absolute;
  width: 0;
  height: 0;
}
div:before {
  border-left: 50px solid transparent;
  border-right: 50px solid transparent;
  border-bottom: 104px solid black;
  top: -75px;
}
div:after {
  border-left: 46px solid transparent;
  border-right: 46px solid transparent;
  border-bottom: 96px solid #fff;
  top: -66px;
  left: 0;
  right: 0;
  margin: auto;
  z-index: 1;
}<div></div>Aqui está uma demonstração da lágrima com uma cor de fundo.
div {
  width: 100px;
  height: 100px;
  border-radius: 50%;
  border: 4px solid;
  background: red;
  margin: 80px;
  position: relative;
}
div:before,
div:after {
  content: "";
  display: block;
  position: absolute;
  width: 0;
  height: 0;
}
div:before {
  border-left: 50px solid transparent;
  border-right: 50px solid transparent;
  border-bottom: 100px solid black;
  top: -70px;
}
div:after {
  border-left: 46px solid transparent;
  border-right: 46px solid transparent;
  border-bottom: 96px solid red;
  top: -66px;
  left: 0;
  right: 0;
  margin: auto;
  z-index: 1;
}<div></div>:after bottom-border da mesma cor. Para alterar o contorno, terá de mudar a cor do contorno div e também a cor de fundo :before.
É muito fácil fazer isto com SVG usando apenas um recurso de conversão de imagens como http://image.online-convert.com/convert-to-svg , que foi usado para criar o seguinte:
<?xml version="1.0" standalone="no"?>
<!DOCTYPE svg PUBLIC "-//W3C//DTD SVG 20010904//EN"
 "http://www.w3.org/TR/2001/REC-SVG-20010904/DTD/svg10.dtd">
<svg version="1.0" xmlns="http://www.w3.org/2000/svg"
 width="213.000000pt" height="300.000000pt" viewBox="0 0 213.000000 300.000000"
 preserveAspectRatio="xMidYMid meet">
<metadata>
Created by potrace 1.12, written by Peter Selinger 2001-2015
</metadata>
<g transform="translate(0.000000,300.000000) scale(0.100000,-0.100000)"
fill="#000000" stroke="none">
<path d="M1035 2944 c-143 -250 -231 -380 -508 -752 -347 -465 -432 -616 -493
-882 -91 -394 10 -753 285 -1013 508 -479 1334 -361 1677 240 126 221 165 494
105 726 -66 254 -178 452 -609 1076 -96 140 -226 335 -288 435 -155 249 -135
229 -169 170z m85 -212 c40 -69 192 -298 543 -818 268 -396 354 -593 364 -835
12 -281 -82 -509 -296 -714 -103 -99 -236 -173 -396 -221 -82 -25 -105 -27
-260 -28 -148 -1 -181 2 -255 22 -348 96 -611 357 -691 689 -41 167 -25 392
41 587 62 185 154 334 444 716 177 235 320 444 402 592 27 49 51 88 54 88 3 0
25 -35 50 -78z"/>
</g>
</svg>Se optar por usar SVG, deve ler os caminhos. Eu também sugeriria um editor SVG.
<svg xmlns="http://www.w3.org/2000/svg" xmlns:svg="http://www.w3.org/2000/svg" xmlns:xlink="http://www.w3.org/1999/xlink" width="100%" height="100%" viewBox="-0.05 0 1195.1 703" preserveAspectRatio="xMidYMid meet" zoomAndPan="disable" transform="">
    <defs id="svgEditorDefs">
        <line id="svgEditorLineDefs" stroke="black" style="fill: none; vector-effect: non-scaling-stroke; stroke-width: 1px;"/>
    </defs>
    <rect id="svgEditorBackground" x="0" y="0" width="1195" height="703" style="fill: none; stroke: none;"/>
    <path stroke="black" id="e1_circleArc" style="fill: none; stroke-width: 1px; vector-effect: non-scaling-stroke;" d="M 198 207 a 117.969 117.969 0 1 0 213 8" transform=""/>
    <path stroke="black" id="e4_circleArc" style="fill: none; stroke-width: 1px; vector-effect: non-scaling-stroke;" transform="" d="M 411.348 215.696 a 349.677 349.677 0 0 0 -110.37 -131.718"/>
    <path stroke="black" style="fill: none; stroke-width: 1px; vector-effect: non-scaling-stroke;" transform="matrix(-0.182706 -0.983168 0.983168 -0.182706 157.664 417.408)" id="e6_circleArc" d="M 301.799 202.299 a 329.763 329.763 0 0 0 -102.951 -124.781"/>
</svg>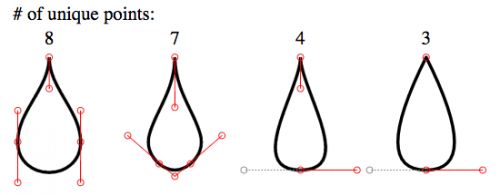
<svg viewbox="-20 -20 180 180">
  <g stroke="black" fill="none">

    <path transform="translate(0)"
     d="M   0  0
        C   0 10  10 17  10 27
        C  10 40 -10 40 -10 27
        C -10 17   0 10   0  0
        Z"/>

    <path transform="translate(40)"
     d="M   0  0
        C   0 16  15 25   5 34
        Q   0 38         -5 34
        C -15 25   0 16   0  0
        Z"/>

    <path transform="translate(80)"
     d="M   0  0
        C   0 10  18 36   0 36
        S          0 10   0  0
        Z"/>

    <path transform="translate(120)"
     d="M   0  0
        Q  18 36   0 36
        T          0  0
        Z"/>


    <g stroke-width="0.25" stroke="red">
      <g transform="translate(0)">
        <ellipse rx="1" ry="1" cx="0"   cy="0" />
        <ellipse rx="1" ry="1" cx="0"   cy="10"/>
        <ellipse rx="1" ry="1" cx="10"  cy="17"/>
        <ellipse rx="1" ry="1" cx="10"  cy="27"/>
        <ellipse rx="1" ry="1" cx="10"  cy="40"/>
        <ellipse rx="1" ry="1" cx="-10" cy="40"/>
        <ellipse rx="1" ry="1" cx="-10" cy="27"/>
        <ellipse rx="1" ry="1" cx="-10" cy="17"/>
        <line x1="0"   y1="0"  x2="0"   y2="10"/>
        <line x1="10"  y1="17" x2="10"  y2="40"/>
        <line x1="-10" y1="40" x2="-10" y2="17"/>
      </g>
      <g transform="translate(40)">
        <ellipse rx="1" ry="1" cx="0"   cy="0" />
        <ellipse rx="1" ry="1" cx="0"   cy="16"/>
        <ellipse rx="1" ry="1" cx="15"  cy="25"/>
        <ellipse rx="1" ry="1" cx="5"   cy="34"/>
        <ellipse rx="1" ry="1" cx="0"   cy="38"/>
        <ellipse rx="1" ry="1" cx="-5"  cy="34"/>
        <ellipse rx="1" ry="1" cx="-15" cy="25"/>
        <line x1="0"  y1="0"  x2="0"   y2="16"/>
        <line x1="15" y1="25" x2="0"   y2="38"/>
        <line x1="0"  y1="38" x2="-15" y2="25"/>
      </g>
      <g transform="translate(80)">
        <ellipse rx="1" ry="1" cx="0"   cy="0" />
        <ellipse rx="1" ry="1" cx="0"   cy="10"/>
        <ellipse rx="1" ry="1" cx="18"  cy="36"/>
        <ellipse rx="1" ry="1" cx="0"   cy="36"/>
        <ellipse rx="1" ry="1" cx="-18" cy="36" stroke="gray"/>
        <line x1="0"  y1="0"  x2="0"   y2="10"/>
        <line x1="18" y1="36" x2="0"   y2="36"/>
        <line x1="0"  y1="36" x2="-18" y2="36" stroke="gray" stroke-dasharray="0.5"/>
      </g>
      <g transform="translate(120)">
        <ellipse rx="1" ry="1" cx="0"   cy="0" />
        <ellipse rx="1" ry="1" cx="18"  cy="36"/>
        <ellipse rx="1" ry="1" cx="0"   cy="36"/>
        <ellipse rx="1" ry="1" cx="-18" cy="36" stroke="gray"/>
        <line x1="18" y1="36" x2="0"   y2="36"/>
        <line x1="0"  y1="36" x2="-18" y2="36" stroke="gray" stroke-dasharray="0.5"/>
      </g>
    </g>
  </g>
  <g font-size="6" transform="translate(-1.5,-4)">
    <text x="-10" y="-8"># of unique points:</text>
    <text transform="translate(  0)">8</text>
    <text transform="translate( 40)">7</text>
    <text transform="translate( 80)">4</text>
    <text transform="translate(120)">3</text>
  </g>
</svg>